Pages

Subscribe:

Saturday, March 9, 2013

The Motherboard: The Thing that Keeps Everything Together... Yeah!

     This post will likely be shorter than the others. The reason for this is that motherboards themselves don't really have much of a history. Before the introduction of the motherboard, computers would use circuit boards called "backplanes".
Backplane
Motherboard
These boards were essentially just hubs for the rest of the components in the computer. Each individual component had its own circuit board, which would then be plugged into the backplane so that it could communicate with the other components. To get rid of the problems of inconvenience, space consumption, and high prices, the computer industry began to think that they should try to consolidate some of the parts of the computer onto one piece. The first company to take the challenge was IBM. With their 1981 IBM Personal Computer, they integrated a motherboard that had expansion slots for peripherals such as video cards and sound cards, as well as an already-integrated sound processor.
     Today, motherboards are almost exactly the same as in 1981. They serve as a means for the rest of the components in the system to communicate with each other. The only major differences are that motherboards today are much faster, they have many more ports on them (such as USB ports, SATA ports for hard drives, etc., etc.) and that some come stock with all the components you need for a functioning computer.
Foxconn H61S
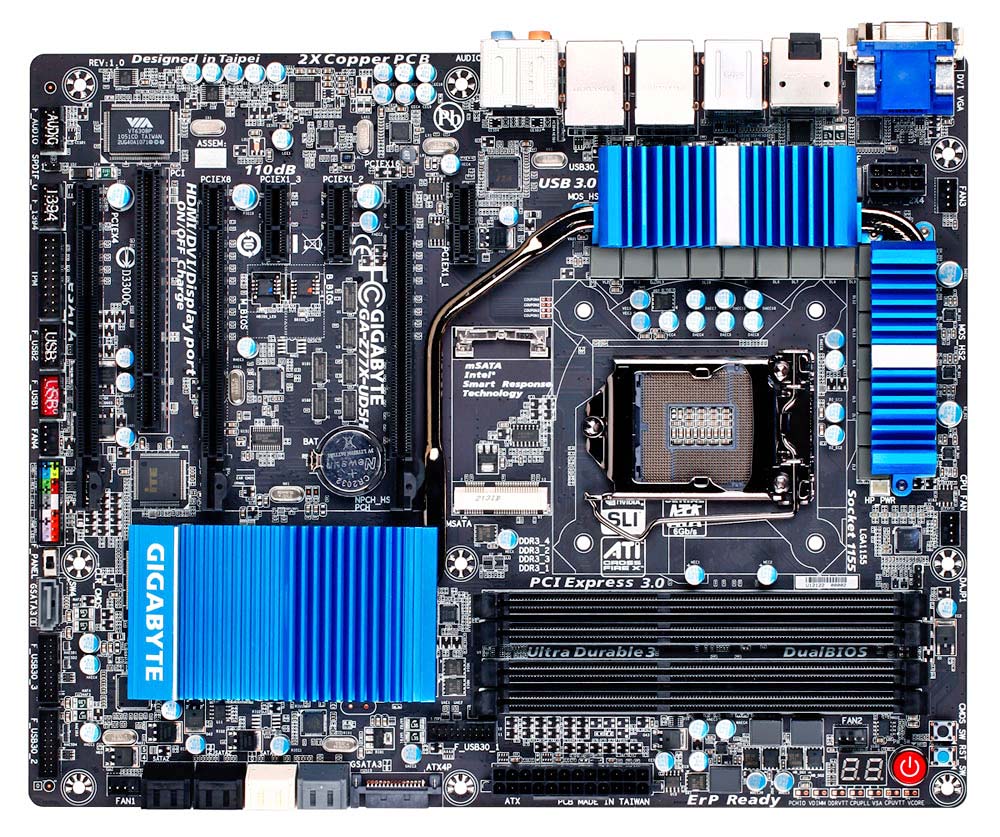
For example, the motherboard you see on the left has 8 USB ports, 8 SATA ports, 4 slots for RAM, a CPU socket, 7 expansion slots, and numerous different electrical headers that connect to less important parts of a computer. Now, keeping in mind that the computer I plan to build must be kept on a very low budget, I have selected a motherboard that I think will provide a great bang for the buck. The motherboard I chose to include in my system is the Foxconn H61S. This is a Mini-ITX form factor motherboard, as my build is based on the Mini-ITX size. I chose this board for three reasons. The first reason is that it is incredibly low-priced. It comes in as the least expensive ITX motherboard on the market at just $50. The second reason is that it has received high ratings, even though it is so inexpensive. Most of the time, in the computer world, "cheap" means "low-quality", and that is certainly not the case here. Reviewers are unanimous that this board handles high-end processors like the Intel Core i5 and i7 perfectly, and hasn't broken yet. The third, and most important reason I chose this motherboard is that it comes with so many great features. It has 2 RAM slots, capable of handling 8gb of RAM. It also has built-in video processing, with a VGA port right at the back, therefore eliminating the need to buy an expensive video card. It also has an extra fan header so that the fan in my case can be plugged in. Overall, I think that this board is fantastic for the price, and it should do everything I need it to for this project just fine. Once again, I am excited to see where this project goes in the future, and how the build will look at the end!

Works Cited:

  • http://www.buzzle.com/articles/history-of-computer-motherboards.html
  • http://www.ehow.com/info_12172410_invention-first-motherboard.html 
Build: http://pcpartpicker.com/p/3I02


Friday, March 1, 2013

Blogs I've Followed This Cycle

http://benowitzianblog.blogspot.com/ Max Benowitz/Owen Reilly
http://kuroy22.blogspot.com/ Chris Annunziato
http://ianhebrew.blogspot.com/ Ian Wilenzik

The Heart of the Beast!

     This week was the first week of actual work of this project. And I'll say, I really don't think that it's much work at all. In talking with other people, I've found that they have the same idea too. This week, I began researching the first component of my proposed build: the CPU, or processor. In my historical research, I found many interesting facts about the lineage of the Central Processing Unit. As it turns out, the first method of processing information in computers was to use vacuum tubes. After this, a little, unknown company called Intel began developing the first microprocessor. This processor was called the Intel 4004, and it was released in November of 1971. After the 4004 came the 8008, which is actually the long-lost ancestor of the modern Intel Core i7 processor.
     Once these microprocessors became popular, people began developing ways to make them more powerful. The first of these methods was multi-threading. By doing this, the processor could better handle multitasking, such as running multiple programs at one time, on top of each other. Along with multi-threading came multi-core processors. These types of processors are the only type made today, besides the Intel Atom. Surely, most of you have heard of the Intel Core 2 Duo. This processor has 2 processing cores, hence "Core 2 Duo". Processors today usually have 2, 4, 6 or 6 cores. AMD, another microprocessor manufacturing company, has even developed a series of 8-core processors. by adding multiple cores to a processor, the processor can tell itself how to optimize its own performance and make the computer it is in run faster.
     Since processors  were becoming faster an processing more information at one time, they were also developing more heat. To keep the CPUs from goint too fast and overheating, Intel developed the concept of a "clock speed" this factory-set maximum processing speed made it so that processors could only allow themselves to compute a certain amount of data at one time. This solved the problem of overheating. However, now Intel develops "unlocked processors" that allow the user to overclock them as much as they want, so long as they have an adequate cooling solution.
     As for the future of computing, it looks promising. Based on Moore's law, which states that the amount of transistors placed on a circuitboard doubles every two years. However, in the distant future, it appears that quantum computing is not out of our reach. Advanced science institutions such as MIT are developing computers that utilize quantum processing units that, in short, can process data as both a 0 and a 1 at the same time. Today, information sent in binary can only be processed as a 0 or 1 (on or off), allowing for a very large, but still finite, amount of information. By utilizing quantum processors, the amount of information that could be stored, accessed, and used would increase almost infinitely.
     Now, onto the actual application of this week's reserch. To reiterate my goal, I want to create a computer for the final product of this project. Each week, I'm researching one major aspect of a computer system, and choosing an adequate part to put into my actual build. The link to my conceptual build can be found here. I will update it every week. http://pcpartpicker.com/p/1GSd
     This week, as you know, I focused on the processor. As AMD and Intel are the two main competitors in the processor market, I looked at processors from those two companies. Each company has a pretty concrete set of pros and cons for their products. From Intel, you get exceptional processing effiency, consistent processing rates, and legendary reliability. However, the monetary price you pay for a processor equivalent to one from AMD is pretty uneven. Also, Intel processors are notorious for having very high power-consumption, which means that your system will push your electric bill up quite a bit. If you were to choose an AMD processor, you'll get an awesome price-to-performance ratio, low power consumption, and a reliable product. However, their processors only support dual-channel RAM. The two contenders in my build were the Intel Celeron G530, and the AMD A4-3400. Both processors are incredibly cheap, as my build needs to be as cheap as possible. However, they both have very good price-to-performance ratios. The processor that I chose to go with is the Celeron G530. I chose this processor due to the incredible amount of customer reviews and vendor reviews that said its processing was very fluid and consistent. As I will be presenting in front of a lot of people on the computer I propose to  build, I definitely do not want a processor that fluctuates between working and not working. Another thing that was good to hear about this processor was that it is good enough to handle light gaming (a surpising qualification for such a low-end processor, trust me), and that it is perfect for a workstation PC for surfing the web and doing Word documents/PowerPoint presentations.
     Overall, I learned much more than I thought I would about the heart of a computer this week. I chose a great part for my build, and I'm very excited to pick out the next part! Next week, I'll be researching and choosing a motherboard. Stay tuned! :)

Pictures:


Sources:
      -      http://library.thinkquest.org/26532/inside/history/index.html


Thursday, February 21, 2013

Blog Post 1


This first post should be about goals and how I’ll measure goals and achievements. To begin, my goal for the end of the project is to build a small computer. This will require tons of research and a constant monitoring of the “small things”. Specifically, I think that my time will be parsed out in a piece-by-piece fashion. For example, one week, I’ll research the aspects of the processor. Another week, I may research the aspects of the motherboard, and so on and so forth. The specific aspects that will occupy my time are probably going to be things like “how to pick the parts so that they work with each other”, and then “how to optimize the parts, in relation to each other”. This will allow me to learn much more about the parts themselves and how they work together in a system. It will also gradually teach me how I can apply those concepts of electronic cooperation to my later computer-related endeavors.
In the first day of each cycle, I will begin researching the history and evolution of each product. For example, in researching the processor, I would research what the first processor was, how they were applied to old computers, and how they have evolved since then. By doing this research for each specific component of the system, I will be able to more effectively choose the parts for my build and truly make sure that each one is optimized for all of the others.
In the second to fourth days of the cycle, I will do my research on the component I have chosen to focus on that week. This research will include watching YouTube videos, reading customer reviews of products, and reading specification outlines of various products in each component category made by the manufacturers themselves. This process takes the longest because many of these reviews and outlines are either videos that last up to 45 minutes, or papers that can be up to 5 pages long. By reading the product outline, I will gain insight into the inner workings of the component, and learn about what it’s actually doing while in a computer system. On the other hand, by reading customer reviews, I will be able to see what the customers think, and how their personal experience went after they purchased the product. This knowledge, although not very consistent, will aid me in choosing the parts for my final product, as optimization and durability are key. In the middle are the professional reviews. These reviews are done by people working for internet companies, such as Newegg.com and NCIX.com, as well as each of their YouTube channels. The people that review the products have knowledge of the inner workings that far exceeds that of the average consumer, but not so much that they know everything the manufacturer does. Often times, the reviewer will give advice on why you should/shouldn’t buy a specific product, as well as which scenarios it would be best suited for. This category of research will probably be my most valuable source because all of the information is there, with a bit of advice thrown in.
During the fifth day of each cycle, I will apply the knowledge that I have acquired through research to my actual build. Using a handy website called Pcpartpicker.com, I will gradually add one part after another to the build. For example, in cycle 1, I will add a processor. In cycle 2, I will add a corresponding motherboard, etc., etc. Eventually, this process will lead me to have a complete list of parts by the last week of the project. After this, I will order the parts, and build the machine. Seeing as I already know a good deal about computers, I will not be heavily researching the components that stay the same when building a smaller machine than normal, such as hard drives, optical drives, and things of that nature. These parts will be pre-configured on Pcpartpicker.com, as they are universally compatible. Also during the fifth day of the cycle, I plan to outline my blog post, so that I do not have to rush to get it done on day 6.
On the sixth day of the cycle, I will complete my blog post, outlining my experience for the week. I plan to include important historical findings, applicable/fascinating facts that I learned, as well as a link and/or picture of the progress of my configuration.
My primary goal for the project is to have everything flow smoothly. I do not want to be backed up on research or any other aspect of the project during any one cycle. Another goal that I have is to simply learn more about computers and their parts. Seeing as this is a passion of mine, I am very excited to find out as much as possible about how I can make the computers I configure better.